FreeBSD diskless on VirtualBox
Sept. 23, 2013, 2 a.m.
Firstly what is FreeBSD diskless? FreeBSD diskless is an operating system that will boot on your computer (or virtual machine) over the network. There are many situations in which you probably want to use such a configuration. For example if you are a computer science teacher you could configure one system in your class and make other computers use it over the network. In another situation you could need some laboratory to play a little with the FreeBSD kernel.This configuration has a lot of benefits. For example you don't have to restart your developer machine every time you compile the kernel or worry that you broke your kernel and you will not have a developer machine any more. If you know me a little you probably know that I'm not a computer science teacher.
I found a lot of interesting articles on this subject, but there was always one step that I would miss (or they). So I decided to write one final post about how to configure a FreeBSD diskless machine on VirtualBox. If you don't want to boot FreeBSD on VirtualBox but to create it just on a normal machine I recomended that you read this page from the handbook (http://www.freebsd.org/doc/handbook/network-diskless.html).
I'm using the GNU/Linux operating system so my mentor and I (ya, I have a mentor, I am participate in GSoC (https://developers.google.com/open-source/soc/) and I'll probably write a few words about this later) decided to use VirtaulBox machines to create a developer environment for me. One virtual machine with FreeBSD and some cool stuff will by my developer machine and the second and third and fourth and x (give x the value you actually need in this moment) will run the operating system loaded from network with my custom kernel. So lets skip boring thing and let's assume that you have installed FreeBSD and some ports that you need.
FreeBSD KERNEL
Firstly we need to get the FreeBSD kernel. What is cool about the FreeBSD kernel source code is that you can get it from many places (perforce, svn, etc...). For example, you can get the stable version of FreeBSD 9 from (svn://svn.freebsd.org/base/stable/9/) or just see what it looks likes on (http://svn.freebsd.org/base/stable/9/).
When you have got the FreeBSD kernel source code you are ready to customize it. For doing that go to sys/$ARCH/conf ($ARCH is your architecture, for example AMD64 or i386) there will be file called GENERIC copy it:
cp GENERIC MYKERN
Edit it a little. If you don't know what modules you need you can leave it as is, but if you know what modules you don't need, it is recommended to remove them from the list. This will shorten the time you need to spend compiling the world and the kernel. To compile the world (you must be in a subdirectory) use simple the command:
$ make -j$NUMBER_OF_PROCCESOR buildworld KERNCONF=MYKERN -DNO_CLEAN
It can take a while, when i use 8 processors it takes around 2 hours. Now we can finally build the kernel:
$ make -j$NUMBER_OF_PROCCESOR buildkernel KERNCONF=MYKERN -DNO_CLEAN
Worth mentioning is the last option NO_CLEAN. It will prevent make from deleting yours compiled files so if you terminate compilation it will start in the place you left off.
Before you install your kernel you should create the root filesystem. To do so, you run two simple commands:
$ make distrib-dirs KERNCONF=MYKERN DESTDIR=/path/to/mykernel/root/filesystem
$ make distribution KERNCONFMYKERN DESTDIR=/path/to/mykernel/root/filesystem
To install world and kernel you use the commands:
$ make installworld KERNCONF=MYKERN DESTDIR=/path/to/mykernel/root/filesystem
$ make installkernel KERNCONF=MYKERN DESTDIR=/path/to/mykernel/root/filesystem
If you don't want to type DESTDIR every time you can add the following lines to /etc/src.conf
.if ${KERNCONF} == "MYKERN"
DESTDIR?=/path/to/mykernel/root/filesystem
MODULES_OVERRIDE=md ufs
.endif
Now you enable installing the kernel using simpler instructions:
$ make installkernel KERNCONF=MYKERN make installworld KERNCONF=MYKERN
LiveCD
If you don't want to work on the kernel and just want to configure diskless you can download the FreeBSD livecd and unpack it. You don't have to do anything more with the kernel or world in this method.
VIRTUALBOX CONFIGURATION
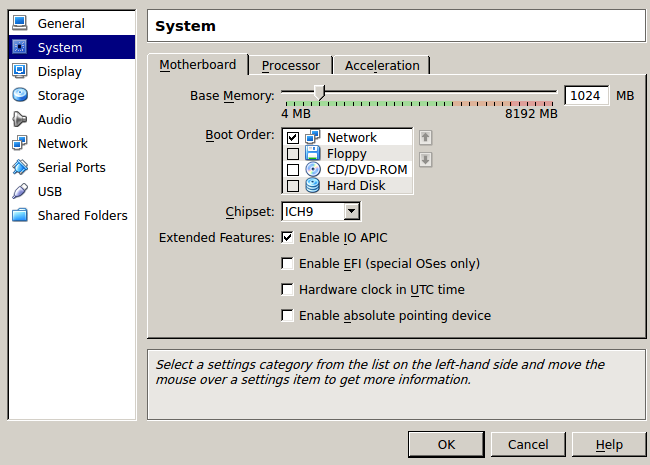
You have to create some virtual machine. In the default wizard just pick some name and choose type FreeBSD. After creating such a machine you go to the options to system tab. You leave only Network boot from boot order dialog.
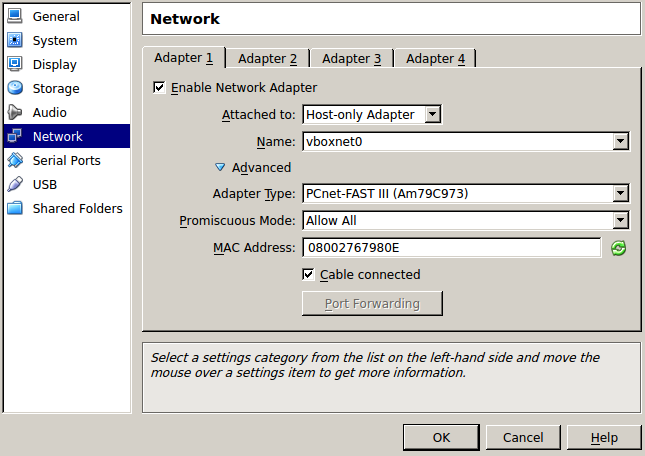
Next you are go to the Network tab and you choose:
Attached to: Host only Adapter
In advanced options: PCnet-FAST III
And write down somewhere your MAC address.
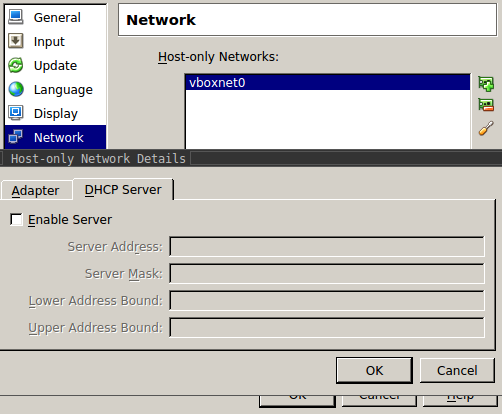
The last and the most important step is to disable the VirtualBox DHCP server, to do it you go to File->Preferences->Network. Select vboxnet0 and click screwdriver then you go to the DHCP Server tab and disable it.
You must now kill the VirtualBOX DHCP server:
# pgrep -fl DHCP
# pkill -15 DHCP
Or just restart your Computer (if you are using windows I am not sure if you must manually kill the DHCP server).
TFTP SERVER
TFTP will be used to transfer pxeboot(8). pxeboot is a bootloader built specifically to boot the system form the LAN. If you are more interested about that program you can read about it in manual (man pxeboot). To enable TFTP you should edit file /etc/inted.conf and uncomment the line:
tftp dgram udp wait root /usr/libexec/tftpd tftpd -l -s /tftpboot
After the -s parameter you give the directory that you would like to have pxeboot. To get pxeboot you simply copy it from your boot directory (/boot/pxeboot). You should also enable inetd in rc.conf:
echo inetd_enable="YES" >> /etc/rc.conf
To restart the tftp server simple use the command:
# service inetd restart
To check if evrything works you can do the following test (let's assume that I have pxeboot in /tftpboot/boot):
$ tftp localhost
tftp> get boot/pxeboot
Received 260098 bytes during 0.7 seconds in 511 blocks
tftp>
If everything goes ok you should see very similar output.
NFS SERVER
To set up your NFS server you should edit the /etc/exports file, where you can define which directory will be exported. For example, your /etc/exports file could look like this:
/root/directory -alldirs -maproot=root -network 192.168.56 -mask 255.255.255.0
Which means that you want to export /root/directory and all directories in it (-alldirs option) to all machines which have an IP address looking like 192.168.56.x where x is a number between 1 and 255. -maproot=root options mean that you allow the root user to write data in exported directories. If you don't set this flag you will be not able to write in the root directory and you will probably have some trouble in using your diskless machine. If you are more interested in the available options for NFS you could find them in the manual (man 5 exports).
You should also add some settings to /etc/rc.conf
$ echo nfs_server_enable="YES" >> /etc/rc.conf # This host is an NFS server (or NO).
To restart the NFS server after making changes use the simple command:
# service nfsd restart
To check if everything is working you can do two things. The first is to check what directory your server is exporting:
$ showmount -e
Exports list on localhost:
/root/directory/ 192.168.56.0
If showmount shows you exactly what you have configure you can try to mount your NFS directory (assuming your NFS server has the IP address 192.168.56.1):
# mount 192.168.56.1:/root/directory/ /mnt
If you succeed in mounting your directory that means your NFS config is correct. And you can read further. If NFS isn't working properly and you are sure that your /etc/exports is correct you could also try adding the following options to /etc/rc.conf:
rpcbind_enable="YES"
nfs_server_enable="YES"
mountd_enable="YES"
mountd_flags="-r"
The last step in configuring NFS is to configure your root directory. We must set up a few files.
Firstly /root/directory/etc/fstab. We must tell our system where and what it should mount:
# Device Mountpoint FStype Options Dump Pass#
192.168.56.1:/root/diectory / nfs rw,noatime,nolockd 0 0
If you add some more directories like /ports or /home to /etc/export you should also paste those directories here. The next thing to do is configure /root/directory/boot/loader.conf. This is the file that will by loaded by pxeboot:
autoboot_delay="3"
beastie_disable="YES"
boot.nfsroot.options="nolockd,tcp"
console="vidconsole,comconsole"
comconsole_speed="38400"
And the last file to configure is /root/directory/etc/rc.conf:
sshd_enable="YES"
sendmail_enable="NO"
sendmail_submit_enable="NO"
sendmail_outbound_enable="NO"
sendmail_msp_queue_enable="NO"
cron_enable="NO"
devd_enable="NO"
Is worth checking if we have /root/directory/boot/loader.4th and /root/directory/boot/loader.rc. Sometimes those files are missing after doing installworld and installkernel. If you don't have those files simply copy them from the /boot/ directory.
DHCP SERVER
The last think that we need is the DHCP server. The DHCP server will tell what IP address this diskless machine should have (obviously) but also tell where our boot loader is (pxeboot) and what is the NFS root directory. There are several DHCP servers. I use isc-dhcp. You can find it in (/usr/ports/net/isc-dhcp42-server) I'm using version 42 but all later versions should work just as well.
After installing (if you are a new user you do it by typing: make && make install in the directory /usr/ports/net/isc-dhcp42-server) you should configure the DHCP client. To do it you edit the file /usr/local/etc/dhcpd.conf :
default-lease-time 600;
max-lease-time 7200;
ddns-update-style none;
# You set the subnet and mask the same as in /etc/exports.
subnet 192.168.56.0 netmask 255.255.255.0 {
authoritative;
use-host-decl-names on;
option subnet-mask 255.255.255.0;
option broadcast-address 192.168.56.255;
# host_name it could be any name you want it is not rly important
host host_name {
# hardware ethernet is your earlier written down MAC address from virtualbox
# this allows to identify your virtual machine
hardware ethernet 08:00:27:67:98:0e;
# this defines what IP address your VM should have
fixed-address 192.168.56.107;
# path to pxeboot loader
filename "boot/pxeboot";
# IP address that provides NFS
next-server 192.168.56.1;
# path to the root directory over NFS
option root-path "/root/directory";
# host name that will be set up for your diskless machine
option host-name "host_name";
}
}
I have skipped some less interesting settings. If you are interested in the remaining options I refer you to (man 5 dhcpd.conf. I also want to mention that you can have more than one host section, to add another you just change hardware ethernet and host-name values. Finally you can run your DHCP client:
# service isc-dhcpd restart
Final words
That has been long road but we are finally at the end. You should now run your diskless virtual machine. If everything has been good configured you will see something like:
FreeBSD/x86 bootstrap loader, Revision 1.1
root@hostname, Wed Jul 3 13:39:10 CEST 2013
pxe_open: server addr: 192.168.56.102
pxe_open: server path: /root/directory
pxe_open: gateway ip: 192.168.56.102 Loading /root/directory
|
For a very long time I got message like:
FreeBSD/x86 bootstrap loader, Revision 1.1
root@hostname, Wed Jul 3 13:39:10 CEST 2013
pxe_open: server addr: 192.168.56.102
pxe_open: server path: /
pxe_open: gateway ip: 0.0.0.0
Loading /root/directory
/
If you got a message like this, this means you probably haven't disabled the VirtualBOX DHCP server properly.
I am also obliged to thanks Unavowed for correcting a lot of my misspellings. Thank you!
Cheers and happy hacking!